Google Cloud와 Google Vison API를 사용하는 법에 대해서
구글 클라우드와 구글 비젼에 대해서 이야기를 해보도록 하겠습니다.
구래서 구글 비젼이 뭔데요?
구글 비젼은 이미지 분석과 관련된 API를 제공하고 있습니다. 즉, 이미지와 관련된 많은 종류의 기능들을 제공하고 있습니다.
그런 기능들로는 1. OCR(광학문자인식): 이미지에 있는 글자를 text로 따오는 기능 2. 로고, 렌드마크 인식 3. 얼굴 표정인식등 여러가지 기능들을 제공합니다.
이미지의 있는 글자를 인식하거나, 혹은 얼굴 표정등을 인식하는 어플리케이션을 사용하기에 위해서는 아주 유용한 API입니다. 이런 API를 사용하기 위해서는 무슨 방식으로 코드를 작성해야할까요?
API를 사용하기 위한 사전 절차들 (2019.09.17 시점)
주의할점! 단, Google Cloud SDK를 먼저 설치해야합니다.
설치하는 법
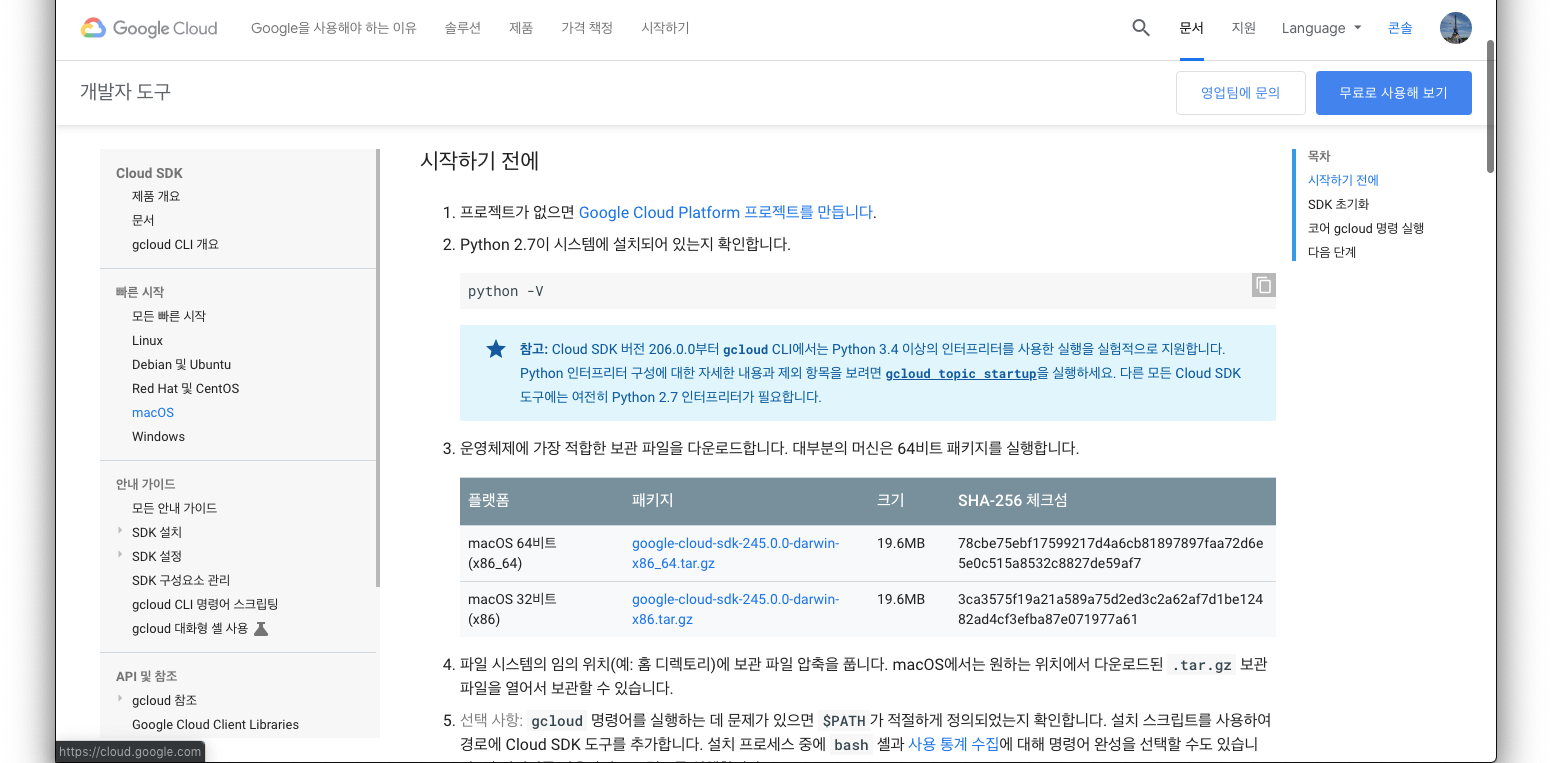
1. 각자의 OS에 맞는 설치 파일을 다운로드 합니다
https://cloud.google.com/sdk/docs/quickstarts
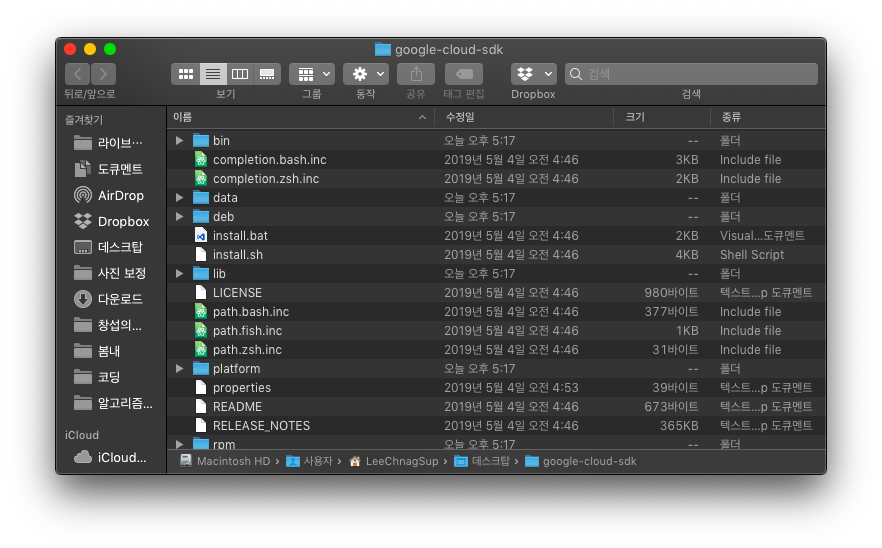
2. 이 파일을 자신이 원하는 위치에 파일압축을 풀어 놓습니다.
3. 그 이후에 쉘 설정파일을 조정해서 파일을 export하거나 직접 설치하는 방식을 택합니다,
https://jungwoon.github.io/google%20cloud/2017/10/26/install-gcloud/
쉘 설정파일을 조작하는 경우에는 이 글을 참조해주세요!
직접 설치하는 경우에는 명령어를 통해서 사용가능합니다.
(자신의 google-cloud-sdk의 상위주소)/google-cloud-sdk/install.sh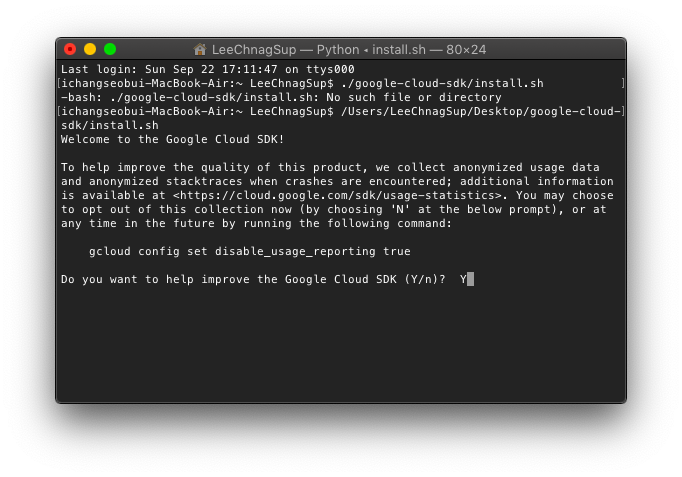
4. 응답하는 질문에 저는 Y로 대답했습니다.

5. 여러가지 설치과정이 지난뒤에 계속 하겠냐는 질문창에도 Y를 누릅니다.

6. 중요! 이제 이 설정 값들을 어디에 저장하겠냐는 질문이 뜹니다. 그냥 두면 /.bash_profile에 혹은 다른 rc 위치에 저장하냐는 뜻입니다.
아까 설치하지 않고, 설정파일을 만지신 분들은 이 경우로 바로 도착해버린 거라고 생각하면 됩니다.
/.bash_profile 위치가 중요합니다. 이 위치를 잘 기억해두세요. 인증 키값이나 인증 export들을 적어야하는 장소가 여기입니다.
그리고 설치가 완료 됩니다.
초기화하는 방법
1. 초기화 방법 역시 명령어로 시작합니다.

2. 구글과 계정연동이 필요하므로 Y를 눌러줍니다.

3. 그러면 웹브라우저에서 제 브라우저가 켜지며, 계정선택화면이 나오는데

4. 선택해주시고, 허용까지 눌러주시면 인증이됩니다.

5. 이와 같은 창이 뜨게 되고, 이 창과는 별개로.

6. 터미널에서는 제가 만든 프로젝트와 연결을 시도 합니다. 실제로 제가 이용할 프로젝트와 연결을 시켜줍니다.

7. 설정이 완료됩니다.

1. 일단 구글 플랫폼에 들어갑니다. https://console.cloud.google.com/home/

2. 라이브러리를 클릭하면 뒤와 같은 화면이 나오게 됩니다.

3. 머신러닝에서 Cloud Vision API를 선택합니다.

4. 현재 저는 이미 등록을 해놓은 상태라서 처음이신 분들은 "사용설정"으로 파란색으로 되어있습니다. 눌러줍니다.

5. 구글 클라우드 SDK가 설치되어 있는 상태에서 권한을 등록해봅시다. (되있지 않다면 설치하기(닫힌글)를 확인해주세요!)

6. 계정선택후 허용하기를 누르면 인증이 됩니다.
API의 사용을 위한 인증키 다운과 인증키 등록 방법
1. IAM 및 관리자에서 - 서비스 계정으로 들어갑니다.

2. 자신의 프로젝트가 띄워져있을텐데 그 프로젝트의 키 만들기를 눌러줍니다. (저같은 경우는 이미 키가 만들어져있어서 이런식으로 뜹니다.)

3. 키는 JSON으로 받아줍니다. 이 키값은 한번만 다운이 되므로 삭제되면 새로 키발급을 받아야합니다.

4. 이때의 키값을 이제 Gcloud의 설정값에 넣어줘야합니다. Gcloud 설정값을 경로 설정해둔 파일을 찾아서 거기에 키값을 등록해줘야합니다. (저는 install.sh를 통해서 그 위치가 .bash_profile입니다..)

5. 키값의 경로를 복사해서 넣어줍니다.
export GOOGLE_APPLICATION_CREDENTIALS="[PATH]"
//이때 PATH는 자신의 JSON 파일이 있는 위치를 뜻합니다.
6. 이후 이 Application에 대한 인증을 해줘야합니다.
gcloud auth application-default login

7. 아까와 비슷하게 또 계정 선택과 허용을 통한 인증 절차가 시작됩니다. 허용해주면, 인증이됩니다.

이런식으로 인증 절차가 마무리 된다면, 이제는 직접 실습을 할 수 있습니다.
실습과 결과물
이클립스의 Maven project를 통해서 실습할 수 있습니다. (이건 maven에서 라이브러리를 직접 받아와서 API를 사용하는 방식입니다.

<dependency>
  <groupId>com.google.cloud</groupId>
  <artifactId>google-cloud-vision</artifactId>
  <version>1.75.0</version>
</dependency>
이런식으로 maven pom.xml에 넣어주면 라이브러리를 사용할수 있습니다.
또한 이 아까의 인증키를 이클립스내부에서 환경변수설정을 해야 실행이 되서, 문제 해결이 되었기때문에 한번 참고 해보는 것도 좋습니다.
(물론 이게 확실한지는 모르겠습니다만, 저는 해결이 되었습니다.)
https://chunsuk4u.tistory.com/entry/Google-Vision-API
Google Vision API.
Google에서 제공하는 이미지분석(?) Vision API에 대해 분석한다. Vision API에 대하여 자세히 알고 싶으시면 https://cloud.google.com/vision/ 접속해서 알아보길 바란다. Google에서 API_KEY가 아닌 아래 그림..
chunsuk4u.tistory.com
저는 기본적으로 text가 많은 필기 인식(OCR)과 이미지 글자 인식(OCR)을 사용했습니다.
샘플 코드들은 여기서 확인 가능합니다.
https://cloud.google.com/vision/docs/detecting-fulltext
문서/필기 입력 텍스트 감지 샘플 | Cloud Vision API 문서 | Google Cloud
문서 텍스트 감지는 광학 문자 인식을 수행하여 이미지의 밀집 문서 텍스트(필기 입력 텍스트 포함)를 감지하는 기능입니다. 로컬 이미지의 문서 텍스트 감지 프로토콜 자세한 내용은 images:annotate API 엔드포인트를 참조하세요. 문서 텍스트 감지를 수행하려면 POST 요청을 보내면서 적절한 요청 본문을 제공합니다. POST https://vision.googleapis.com/v1/images:annotate?key=YOUR_API_KEY { "
cloud.google.com
https://cloud.google.com/vision/docs/detecting-text
텍스트 감지 샘플 | Cloud Vision API 문서 | Google Cloud
텍스트 감지는 광학 문자 인식을 수행하는 기능입니다. 이미지 내에서 텍스트를 감지하고 추출하며, 광범위한 언어를 지원합니다. 또한 자동 언어 식별이 제공됩니다. 로컬 이미지의 텍스트 감지 프로토콜 자세한 내용은 images:annotate API 엔드포인트를 참조하세요. 텍스트 감지를 수행하려면 POST 요청을 보내면서 적절한 요청 본문을 제공합니다. POST https://vision.googleapis.com/v1/images:annotate?key=
cloud.google.com
근데 이게 샘플코드들은 메소드 처럼 사용하기 때문에, 바로 결과를 확인해볼 수 없습니다. 약간 변형시켜서 java 어플리케이션에서 돌아가는 방식으로 활용해보겠습니다.
문서 텍스트 감지 샘플

이런 텍스트가 많은 사진에서 글을 인식하는 코드는 이와 같습니다.
import java.io.FileInputStream;
import java.util.ArrayList;
import java.util.List;

import com.google.cloud.vision.v1.AnnotateImageRequest;
import com.google.cloud.vision.v1.AnnotateImageResponse;
import com.google.cloud.vision.v1.BatchAnnotateImagesResponse;
import com.google.cloud.vision.v1.Block;
import com.google.cloud.vision.v1.Feature;
import com.google.cloud.vision.v1.Feature.Type;
import com.google.cloud.vision.v1.Image;
import com.google.cloud.vision.v1.ImageAnnotatorClient;
import com.google.cloud.vision.v1.Page;
import com.google.cloud.vision.v1.Paragraph;
import com.google.cloud.vision.v1.Symbol;
import com.google.cloud.vision.v1.TextAnnotation;
import com.google.cloud.vision.v1.Word;
import com.google.protobuf.ByteString;

public class GoogleVisionApiTester {
	public static void main(String[] args) {
		try {
			String imageFilePath = ""; //여기에는 자신의 로컬 이미지 명이 들어가야합니다.
			List<AnnotateImageRequest> requests = new ArrayList<>();
			ByteString imgBytes = ByteString.readFrom(new FileInputStream(imageFilePath));
			Image img = Image.newBuilder().setContent(imgBytes).build();
			Feature feat = Feature.newBuilder().setType(Type.TEXT_DETECTION).build();
			AnnotateImageRequest request = AnnotateImageRequest.newBuilder().addFeatures(feat).setImage(img).build();
			requests.add(request);
			try (ImageAnnotatorClient client = ImageAnnotatorClient.create()) {
				BatchAnnotateImagesResponse response = client.batchAnnotateImages(requests);
				List<AnnotateImageResponse> responses = response.getResponsesList();

				for (AnnotateImageResponse res : responses) {
					if (res.hasError()) {
						System.out.printf("Error: %s\n", res.getError().getMessage());
						return;
					}

//					// For full list of available annotations, see http://g.co/cloud/vision/docs
//				      TextAnnotation annotation = res.getFullTextAnnotation();
//				      for (Page page: annotation.getPagesList()) {
//				        String pageText = "";
//				        for (Block block : page.getBlocksList()) {
//				          String blockText = "";
//				          for (Paragraph para : block.getParagraphsList()) {
//				            String paraText = "";
//				            for (Word word: para.getWordsList()) {
//				              String wordText = "";
//				              for (Symbol symbol: word.getSymbolsList()) {
//				                wordText = wordText + symbol.getText();
//				               System.out.format("Symbol text: %s (confidence: %f)\n", symbol.getText(),
//				                    symbol.getConfidence());
//				              }
//				              System.out.format("Word text: %s (confidence: %f)\n\n", wordText, word.getConfidence());
//				              paraText = String.format("%s %s", paraText, wordText);
//				            }
//				            // Output Example using Paragraph:
//				            System.out.println("\nParagraph: \n" + paraText);
//				            System.out.format("Paragraph Confidence: %f\n", para.getConfidence());
//				            blockText = blockText + paraText;
//				          }
//				          pageText = pageText + blockText;
//				        }
//				      }
//				      System.out.println("\nComplete annotation:");
//				      System.out.println(annotation.getText());
//				    }


					System.out.println("Text : ");
					System.out.println(res.getTextAnnotationsList().get(0).getDescription());
					// For full list of available annotations, see http://g.co/cloud/vision/docs
					/*
					 * for (EntityAnnotation annotation : res.getTextAnnotationsList()) {
					 * System.out.printf("Text: %s\n", annotation.getDescription());
					 * System.out.printf("Position : %s\n", annotation.getBoundingPoly()); }
					 */
				}
				}

		} catch(Exception e) {
			e.printStackTrace();
		}
	}
}
참고로 주석처리가 많은데, 여기에 있는 기능들은 대부분 과할정도로 정보를 많이 주기때문입니다. 예를들어, 구문인지 단어인지를 일일히 분석해주기도하고 단락도 구별해줍니다. 그에 맞는 기능을 확인 해보시기 바랍니다.
결과
9월 22, 2019 6:36:37 오후 com.google.auth.oauth2.DefaultCredentialsProvider warnAboutProblematicCredentials
경고: Your application has authenticated using end user credentials from Google Cloud SDK. We recommend that most server applications use service accounts instead. If your application continues to use end user credentials from Cloud SDK, you might receive a "quota exceeded" or "API not enabled" error. For more information about service accounts, see https://cloud.google.com/docs/authentication/.
Text :
누군가의 문장을 읽는다는 건 그 문장 안에 살다
오는 거라 생각한 적이 있다. 문장 안에 시선이 머물
때그 '머물'은 '잠시 산다'라는 말과 같을 테니까. 살
아 있는 사람이 사는 동안 읽는 글이니 그렇고, 글에
담긴 시간을 함께 '살아낸' 거니 그럴 거다. 『청춘의
문장들」에서 선배는 그렇게 '자신이 읽은 문장이 아
닌산 문장'을 우리에게 들려준다. 누군가 오래 쓴
잘 나옵니다. 호호
이미지 텍스트 감지 샘플
이미지의 경우는 약간 다릅니다. 이미지에서 글자를 인식한 위치를 알려줍니다.

이런 이미지의 텍스트를 긁어오는 샘플 코드입니다.
import java.io.FileInputStream;
import java.io.FileNotFoundException;
import java.io.IOException;
import java.util.ArrayList;
import java.util.List;

import com.google.cloud.vision.v1.AnnotateImageRequest;
import com.google.cloud.vision.v1.AnnotateImageResponse;
import com.google.cloud.vision.v1.BatchAnnotateImagesResponse;
import com.google.cloud.vision.v1.EntityAnnotation;
import com.google.cloud.vision.v1.Feature;
import com.google.cloud.vision.v1.Feature.Type;
import com.google.cloud.vision.v1.Image;
import com.google.cloud.vision.v1.ImageAnnotatorClient;
import com.google.protobuf.ByteString;

public class ImgVisonAPI {

	public static void main(String[] args) throws FileNotFoundException, IOException {
		  List<AnnotateImageRequest> requests = new ArrayList<>();

		  ByteString imgBytes = ByteString.readFrom(new FileInputStream("/Users/LeeChnagSup/Desktop/메인화면.jpg"));

		  Image img = Image.newBuilder().setContent(imgBytes).build();
		  Feature feat = Feature.newBuilder().setType(Type.TEXT_DETECTION).build();
		  AnnotateImageRequest request =
		      AnnotateImageRequest.newBuilder().addFeatures(feat).setImage(img).build();
		  requests.add(request);

		  try (ImageAnnotatorClient client = ImageAnnotatorClient.create()) {
		    BatchAnnotateImagesResponse response = client.batchAnnotateImages(requests);
		    List<AnnotateImageResponse> responses = response.getResponsesList();

		    for (AnnotateImageResponse res : responses) {
		      if (res.hasError()) {
		        System.out.printf("Error: %s\n", res.getError().getMessage());
		        return;
		      }

		      // For full list of available annotations, see http://g.co/cloud/vision/docs
		      for (EntityAnnotation annotation : res.getTextAnnotationsList()) {
		        System.out.printf("Text: %s\n", annotation.getDescription());
		        System.out.printf("Position : %s\n", annotation.getBoundingPoly());
		      }
		    }
		  }
		}
}
결과
9월 22, 2019 6:40:28 오후 com.google.auth.oauth2.DefaultCredentialsProvider warnAboutProblematicCredentials
경고: Your application has authenticated using end user credentials from Google Cloud SDK. We recommend that most server applications use service accounts instead. If your application continues to use end user credentials from Cloud SDK, you might receive a "quota exceeded" or "API not enabled" error. For more information about service accounts, see https://cloud.google.com/docs/authentication/.
Text: N Pay
"네이버페이로
점심값보낼게"
연락처 친구에게 송금 시 200원
N 200

Position : vertices {
  x: 1
  y: 12
}
vertices {
  x: 269
  y: 12
}
vertices {
  x: 269
  y: 117
}
vertices {
  x: 1
  y: 117
}

Text: N
Position : vertices {
  x: 20
  y: 12
}
vertices {
  x: 35
  y: 13
}
vertices {
  x: 35
  y: 25
}
vertices {
  x: 20
  y: 25
}

Text: Pay
Position : vertices {
  x: 40
  y: 15
}
vertices {
  x: 59
  y: 16
}
vertices {
  x: 59
  y: 26
}
vertices {
  x: 40
  y: 25
}

Text: "
Position : vertices {
  x: 1
  y: 35
}
vertices {
  x: 22
  y: 35
}
vertices {
  x: 22
  y: 62
}
vertices {
  x: 1
  y: 62
}

Text: 네이버
Position : vertices {
  x: 24
  y: 35
}
vertices {
  x: 82
  y: 35
}
vertices {
  x: 82
  y: 62
}
vertices {
  x: 24
  y: 62
}

Text: 페이
Position : vertices {
  x: 84
  y: 35
}
vertices {
  x: 124
  y: 35
}
vertices {
  x: 124
  y: 62
}
vertices {
  x: 84
  y: 62
}

Text: 로
Position : vertices {
  x: 126
  y: 36
}
vertices {
  x: 143
  y: 36
}
vertices {
  x: 143
  y: 63
}
vertices {
  x: 126
  y: 63
}

Text: 점심
Position : vertices {
  x: 20
  y: 66
}
vertices {
  x: 57
  y: 66
}
vertices {
  x: 57
  y: 87
}
vertices {
  x: 20
  y: 87
}

Text: 값
Position : vertices {
  x: 61
  y: 66
}
vertices {
  x: 80
  y: 66
}
vertices {
  x: 80
  y: 87
}
vertices {
  x: 61
  y: 87
}

Text: 보낼
Position : vertices {
  x: 82
  y: 63
}
vertices {
  x: 124
  y: 63
}
vertices {
  x: 124
  y: 90
}
vertices {
  x: 82
  y: 90
}

Text: 게
Position : vertices {
  x: 126
  y: 63
}
vertices {
  x: 143
  y: 63
}
vertices {
  x: 143
  y: 90
}
vertices {
  x: 126
  y: 90
}

Text: "
Position : vertices {
  x: 146
  y: 66
}
vertices {
  x: 157
  y: 66
}
vertices {
  x: 157
  y: 87
}
vertices {
  x: 146
  y: 87
}

Text: 연락처
Position : vertices {
  x: 21
  y: 100
}
vertices {
  x: 59
  y: 100
}
vertices {
  x: 59
  y: 114
}
vertices {
  x: 21
  y: 114
}

Text: 친구
Position : vertices {
  x: 66
  y: 98
}
vertices {
  x: 91
  y: 98
}
vertices {
  x: 91
  y: 117
}
vertices {
  x: 66
  y: 117
}

Text: 에게
Position : vertices {
  x: 93
  y: 98
}
vertices {
  x: 118
  y: 98
}
vertices {
  x: 118
  y: 117
}
vertices {
  x: 93
  y: 117
}

Text: 송금
Position : vertices {
  x: 123
  y: 100
}
vertices {
  x: 149
  y: 100
}
vertices {
  x: 149
  y: 114
}
vertices {
  x: 123
  y: 114
}

Text: 시
Position : vertices {
  x: 154
  y: 100
}
vertices {
  x: 165
  y: 100
}
vertices {
  x: 165
  y: 114
}
vertices {
  x: 154
  y: 114
}

Text: 200
Position : vertices {
  x: 171
  y: 101
}
vertices {
  x: 189
  y: 101
}
vertices {
  x: 189
  y: 114
}
vertices {
  x: 171
  y: 114
}

Text: 원
Position : vertices {
  x: 192
  y: 100
}
vertices {
  x: 211
  y: 100
}
vertices {
  x: 211
  y: 114
}
vertices {
  x: 192
  y: 114
}

Text: N
Position : vertices {
  x: 237
  y: 60
}
vertices {
  x: 241
  y: 65
}
vertices {
  x: 236
  y: 70
}
vertices {
  x: 232
  y: 64
}

Text: 200
Position : vertices {
  x: 249
  y: 69
}
vertices {
  x: 269
  y: 94
}
vertices {
  x: 259
  y: 102
}
vertices {
  x: 239
  y: 77
}
이렇게 상당히 구체적으로 어떤 위치까지 나오게됩니다.
구글 클라우드 img vision은 이외에도 훨씬 많은 기능들을 제공하게 됩니다. 더많은 기능들은 공식 문서를 확인해보시는것이 좋을 것 같네요.
https://cloud.google.com/vision/docs/
Cloud Vision 문서 | Cloud Vision API 문서 | Google Cloud
강력한 OCR, 이미지 검토, 얼굴 인식, 로고 인식, 라벨 감지 모델을 활용하여 애플리케이션에 컴퓨터 비전을 통합하세요.
cloud.google.com
여담 - 가격 정책
아무래도 기업용 API를 사용하는데 있어서는 가격에 민감할 수 밖에 없는데요. 가격도 확인 해보시기바랍니다.
가격
일단 가장 큰 것만 요약해보자면, 월당 1000번은 무료입니다. 그 이후부터는 금액 산정이 1000개단위로 금액이 매겨집니다. 즉, 1001개를 써도 1.5달러씩 금액이 매겨지게되고, 1999개를 써도 1.5달러가 매겨집니다. 즉, 1000이하의 단위에 대해서는 세절합니다.
2200개를 사용할 경우 2000은 2*$1.5 + 200개를 어쨌든 초과했으니 $1.5를 더 매겨지게됩니다.
자세한 건 공식 홈페이지 문서를 참조하는 것이 좋습니다. 개인적으로 계산했기때문에 차이점이 있을수 있습니다. 가격은 공식 홈페이지를 꼮꼮꼭 참고해주세요!
이미지마다 요금이 부과됩니다. PDF 파일처럼 여러 장의 페이지가 있는 파일은 각 페이지가 개별 이미지로 처리됩니다.
이미지에 적용되는 각 기능이 청구 단위로 집계됩니다. 예를 들어 동일한 이미지에 얼굴 인식과 라벨 인식을 적용하면 라벨 인식 단위 1개와 얼굴 인식 단위 1개에 대해 요금이 청구됩니다.
| 기능 | 단위 1,000개당 가격 | ||
| 0~ 1,000개 단위/월단위 | 1,001 ~ 5,000,000개/월단위 | 5,000,001 ~ 20,000,000개/월 | |
| 라벨 인식 | 무료 | $1.50 | $1.00 |
| 텍스트 감지 | 무료 | $1.50 | $0.60 |
| 문서 텍스트 감지 | 무료 | $1.50 | $0.60 |
| 세이프서치(유해한 콘텐츠) 감지 | 무료 | 라벨 인식 이용 시 무료 또는 $1.50 | 라벨 인식 이용 시 무료 또는 $0.60 |
| 얼굴 인식 | 무료 | $1.50 | $0.60 |
| 랜드마크 감지 | 무료 | $1.50 | $0.60 |
| 로고 감지 | 무료 | $1.50 | $0.60 |
| 이미지 속성 | 무료 | $1.50 | $0.60 |
| 자르기 힌트 | 무료 | 이미지 속성 이용 시 무료 또는 $1.50 | 이미지 속성 이용 시 무료 또는 $0.60 |
| 웹 감지 | 무료 | $3.50 | 자세한 내용은 Google에 문의 |
| 객체 현지화 | 무료 | $2.25 | $1.50 |
https://cloud.google.com/vision/pricing?hl=ko
가격 책정 | Cloud Vision API 문서 | Google Cloud
Cloud Vision API는 이미지를 분석하기 위한 여러 기능을 제공합니다. 아래 시나리오별로 선불 약정 없이 사용한 만큼만 지불하면 됩니다. 이 API에서 지원하는 기능은 다음과 같습니다. 기능 유형설명 LABEL_DETECTION 이미지 콘텐츠에 따라 라벨을 추가합니다(라벨 인식 참조). TEXT_DETECTION 이미지 내 텍스트에서 광학 문자 인식(OCR)을 수행합니다(텍스트 감지 참조). DOCUMENT_TEXT_DETECTION 문서 등 텍
cloud.google.com
길고 긴 포스팅이 끝났습니다. ㅠㅠ 애쓴 저한테 감사하다는 말을 전하고 정말 좋은 API이기때문에 한번 사용해보시기 바랍니다.